
Along with Seam 2.1 comes a handful of enhancements to seam-gen. These changes are a culmination of the mods
I made to the seam-gen project that forms the basis of the sample code for Seam in Action. Perhaps after reading this entry, you'll conclude that the enhancements go well beyond modest.
The improvements to seam-gen can be classified into four categories:
- look and feel
- functional
- project structure / build
- seam script
Since we're all attracted to shiny new things, let's start with the style upgrades and supplement the discussion with some screenshots.
Freshening up seam-gen's look
Both RichFaces and ICEfaces seam-gen projects already carry a touch of elegance thanks to the component styling controlled via CSS-based themes (i.e., skins) bundled with the two libraries. The styles that get imported with a theme are most apparent in the rich layout components from the JSF component sets (e.g., <rich:panel> and <ice:panelTab>). But there are some areas of the page that don't get coverage, such as the form elements and status messages. I figured out a way to stretch the theme across the whole page using RichFaces' theme extensions and some better default styles (unfortunately, the theme extensions only apply to RichFaces projects at this point).
Although it may seem trivial to worry about how the application looks, these style improvements are an important first step to ensuring that your application looks more presentable down the road (giving you one less thing to worry about early on in the project).
Extending the RichFaces skin
RichFaces uses skins to decorate its built-in components. But what's neat is that this skinnability feature is left entirely open to extension. A skin is nothing more than a message bundle that maps colors and font sizes to key names (e.g., panelBorderColor). Each rich component (e.g., <rich:dataTable>) is bundled with dynamically generated CSS that references these key names to style the component according to the theme.
The CSS is generated from an XML-based CSS file, which uses the file extension .xcss. The syntax used in this file consists of both standard and special skin-aware elements and attributes that translate into CSS. To extend the theme, you simply create a custom .xcss file and import it into your page using <a:loadStyle> from the Ajax4jsf component set. If you need to customize the colors and font sizes, or even add an additional skin property, you simply create a file named %SKIN_NAME%.skin.properties and place it at the root of the classpath. You replace %SKIN_NAME% with the name of the RichFaces skin (e.g., emeraldTown).
Details, details, details. Where's the benefit? Well, through the power of CSS, we can make non-RichFaces components look rich! And it's not just about colors, either. It's even possible to generate gradient images using one of the special elements in xcss (<f:resource>). That means we can make slick looking form elements. In seam-gen projects, these additional theme-related styles are defined in the file theme.xcss, which sits adjacent to the existing theme.css file. Here's a snippet from that file which styles text inputs:
<u:selector name="input[type=text], input[type=password], textarea, select">
  <u:style name="background-color" skin="controlBackgroundColor"/>
  <u:style name="color" skin="controlTextColor"/>
  <u:style name="background-position" value="left top"/>
  <u:style name="background-repeat" value="repeat-x"/>
  <u:style name="background-image">
    <f:resource f:key="org.richfaces.renderkit.html.images.SliderFieldGradient"/>
  </u:style>
  <u:style name="border" value="1px solid"/>
  <u:style name="border-color" skin="tableBorderColor" />
</u:selector>
Here's the CSS that this XML markup produces (for the DEFAULT RichFaces theme):
input[type="text"], input[type="password"], textarea, select {
  background-color:#FFFFFF;
  background-image:url(/appname/a4j/g/3_2_2.GAorg.richfaces...SliderFieldGradient...);
  background-position:left top;
  background-repeat:repeat-x;
  border:1px solid #C0C0C0;
  color:#000000;
}
And here's how an input generated by a plain old <h:inputText> would look:
![]()
Keep in mind that the input's style is going to coordinate with the RichFaces theme. That's true of all form elements as well as the general font color and the color of links. See for yourself in the next section.
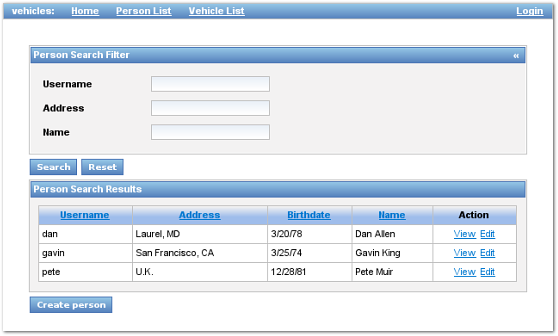
Showing off the new look
Below is a collection of screenshots, which are taken from a seam-gen project generated from the vehicles
schema used for testing seam-gen. These screenshots show off the new styles as they look with various RichFaces themes. The RichFaces theme is controlled using the org.richfaces.SKIN servlet context parameter defined in web.xml:
<context-param>
  <param-name>org.richfaces.SKIN</param-name>
  <param-value>classic</param-value>
</context-param>
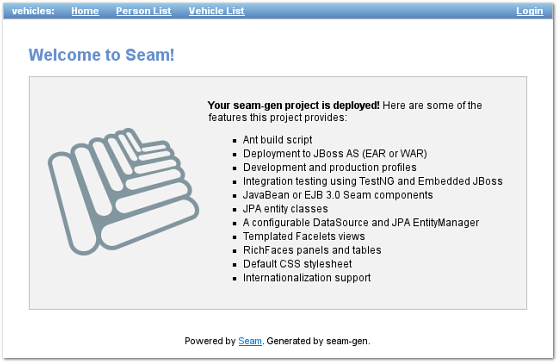
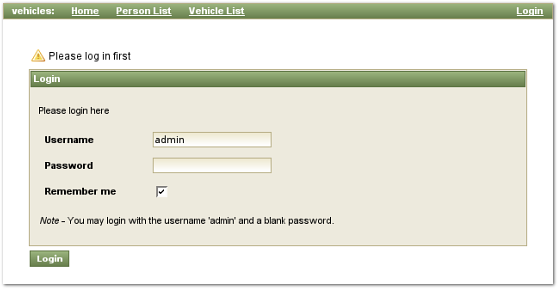
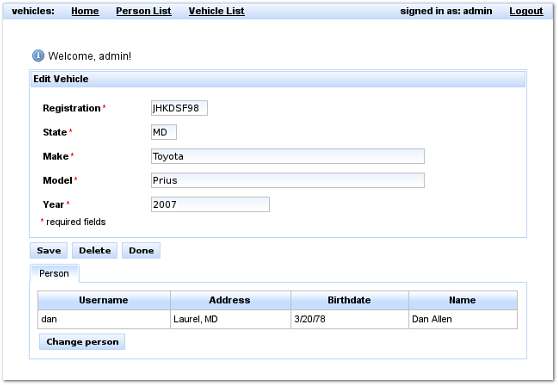
The first thing you'll notice when you deploy a seam-gen 2.1 project is that there is a new home page featuring the Seam logo. Beyond that, you should simply notice that the elements on each page below all coordinate with the selected theme.
You'll notice in these next two screenshots that I have customized the status messages, also true for ICEfaces projects. An appropriate icon is used in front of each status message according to its level (warn, error, and info). While working on this enhancement, I fixed JBSEAM-1517 so that the messages look presentable and don't overlap. (Believe it or not, the messages were still using the orange style from the original seam-gen, which didn't match at all with the RichFaces or ICEfaces theme).
The cherry on top of all this is the favicon of the Seam logo, which is defined in the main Facelets template and appears in the URL location bar. I think this is the sweetest enhancement because it gives you that pride that you are using Seam.
![]()
The only downside of the new theme is that the Visual Editor in JBossTools doesn't understand the xcss file. That's why I left behind an improved version of the theme.css file, which is still used in the main Facelets template. In it, I define static CSS styles that don't rely on the skin properties. It certainly would be cool if the Visual Editor could interpret the xcss file as it would make developers more productive when extending the RichFaces theme. Currently, after making a change to the xcss file, you have to do a hard restart of the application to get RichFaces to reload the generated CSS (and with some browsers you also have to clear out the browser's cache).
That's enough about styles for now. There are a couple other enhancements to the application's presentation that fall more along the lines of functional, so we'll look at those next.
Just what the boss ordered
As I talk about enhancements to seam-gen, it's important to keep in mind the purpose of seam-gen so we don't lose perspective. seam-gen provides two key services:
- A starting point for developing with Seam, saving you from
getting started
tedium - A broad demonstration of Seam features that you can begin building on
seam-gen is not going to do your job for you. With that said, there were a lot of areas of inconsistency in the generated project and other things that seam-gen could do better. Here's a list of functional changes that were made to seam-gen projects, which were mostly developed to satisfy requests that trickled down from management:
- Human-readable labels are generated from property names using a camel-case translation (i.e., camelCase => Camel case)
- The proper converter is applied whenever outputting the value of a property (e.g., date, time, number)
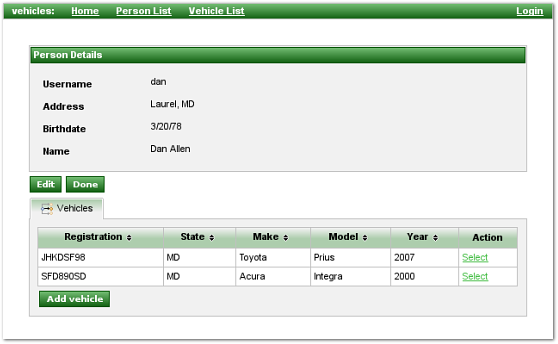
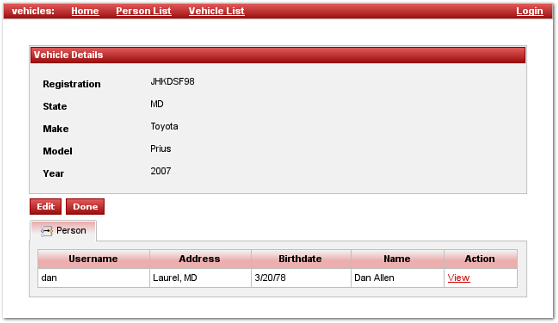
- Icons are used in the tabs on the detail pages to denote parent and child associations
- The markup for the sort links in the column headers on the listing pages is simplified using a Facelets composition template
<ui:include src="layout/sort.xhtml"> <ui:param name="entityList" value="#{personList}"/> <ui:param name="propertyLabel" value="Name"/> <ui:param name="propertyPath" value="person.name"/> </ui:include> - Client-side sorting of columns in the child association table is enabled on the detail pages (leveraging the RichFaces table)
- Activated sorting on the listing page for properties on a component or composite key (e.g., vehicle.id.state)
- JPQL used for sorting is now compliant
- Added a link in each row on the listing page to edit the record (previously only possible from detail page)
- Changed the default username to admin, still allowing any value for the password. The failure login scenario can now be triggered out of the box.
- One-to-one associations are linked up in the UI the same way as many-to-one associations
- Introduced a
head
named insertion in the main Facelets template (view/layout/template.xhtml) for adding additional markup to the <head> element on a per-page basis<ui:define name="head"> <script type="text/javascript"> window.onload = function() { ... } </script> </ui:define> - Moved the <h:messages globalOnly="true"> declaration to the main Facelets template and conditionally check a Facelets parameter named showGlobalMessages to turn them off on a per-page basis
- The conversation is not propagated by links in the main menu bar (i.e., propagation="none")
- Added a button to reset the search on the list pages
- The entity manager is switched to manual flush mode when editing a record
- A UI command link was added to to the debug page for destroying a selected conversation (not specific to seam-gen)
I'm sure there are other small enhancements that I am forgetting about, which I will leave for you to discover. Let's move on to the project structure and build changes.
Semantically speaking
seam-gen projects are still built using Ant and they still have fundamentally the same (quirky) structure. What I did, though, was fix a semantic error. I changed the source directories so they better reflect how they are built rather than what classes they contain. In Seam 2.0, the two main source directories were:
- src/action
- src/model
Components in src/action were added to hot deployable classpath when running in development mode, whereas components and regular classes in the src/model directory ended up on the main (static) classpath. In production mode, of course, the resources in these two directories both would end up in the same classpath. The problem is that hot deployable components are not necessarily action components and non-hot deployable components are not necessarily model classes. To fix this semantic mixup, the source directories are now:
- src/hot
- src/main
I trust that you can immediately grasp the purpose of these two source directories and thus feel more comfortable finding a place for the class you are about to create. Unfortunately, JBossTools still uses the old convention for the time being. Despite the difference, it has no problem consuming a seam-gen project with the new folder names since, internally, it relies on a mapping between folder name and function (seam-gen prepares the mapping configuration to reflect this new convention).
Naturally, the project build script was updated to accommodate the new names for these source directories. But there are several other changes that came out of my meddling with the build.
More muscle under the hood
First and foremost, tests which extend SeamTest can now be run using Java 6! This was a huge frustration for me and I am thrilled to have worked out a solution. The issue is really that the Embedded JBoss container is sorely out of date and flakes out on Java 6. Until a newer version of Embedded JBoss is ready, the workaround is to use and endorsed JAR file to fix a conflict with JAX-WS and to allow a special array syntax specific to the Sun JDK. You can check the test target in the build file for the specifics.
Fans of Groovy will be excited to learn that it's now possible to use Groovy components in EAR projects. The EAR project build compiles Groovy scripts on the classpath using groovyc, making them bona fide Java bytecode. (Getting seam-gen EAR projects to interpret .groovy files at runtime requires some more research). But what's even more exciting is that you can now write tests in Groovy (again compiled using groovyc) and test components written in Groovy. Really, this was just a matter of putting the build logic in place, but it's still important to know that you can get the Groovy support right out of the box. There's still work to be done to make the support for Groovy more elegant, but for now it is at least comprehensive.
Here's a bunch of other goodies that were thrown into the build:
- seam-gen WAR projects now have a consolidated compile target
- two new targets, reexplode and redeploy, execute clean unexplode explode or clean undeploy deploy, respectively
- the restart target now detects if you have deployed an exploded or packaged archive and restarts the application appropriately (before it bombed if you had a packaged archive deployed)
- the view folder is added to the classpath during the execution of tests so that page actions defined in fine-grained page descriptors (i.e., .page.xml) get invoked properly (previously tests only read the global page descriptor (i.e., pages.xml)
- a new target named javadoc generates JavaDoc API from the project source
If you are interested in getting the dependencies of a seam-gen project under control, check out my article about how to manage the dependencies of a seam-gen project with Ivy.
That wraps up just about all the changes to seam-gen projects. All in all, what these upgrades should do is make your demos of Seam look just a touch prettier and give you more hammers to swing during development. Obviously, there are still plenty of improvements that could be made, so feel free to contribute them. Patches generated with svn diff are preferred.
In the final section, I want to talk about the changes that were made to the seam script and the different ways that it can now be invoked.
Removing the shackles from seam-gen
The seam script (which we all call seam-gen) has finally been set free. In the past, the seam script hasn't been as comfortable to use as other project generation tools, such as Grails, because the developer has been locked into having to execute it from a Seam distribution directory. The approach that Grails takes is to add the location of the grails script to your PATH, set GRAILS_HOME, and use the script like a system command. I have an approach that falls somewhere in between and that I believe is more flexible.
Thanks to changes in the bootstrap script, you can now run seam out of any directory on the computer and it will work as it does today (meaning your current working directory can be anywhere). The seam script still has to reside in a Seam distribution directory or the SEAM_HOME environment variable must be set if it doesn't, but now you have a third option of creating a symlink to the seam script from a directory already on your path (such as ~/bin). Internally, the script figures out your current directory and the SEAM_HOME environment variable relative to the location of the script (there is no reason to make the developer set the SEAM_HOME environment variable, though it's still honored if present). More on the current working directory in a second. The point so far is that the seam script is going to work from anywhere. No more silly restrictions.
As a side note, I want to mention that I added a validation check in the bootstrap routine that verifies the user has the JAVA_HOME environment variable defined and that it resolves to a valid JDK installation. Otherwise, the Ant build is going to fail anyway.
Ever since Seam 2.0, the seam create-project command has been moving the build.properties that holds the responses from seam setup to the file seam-gen.properties in the root of the project. But we haven't done anything with this file yet...until now. Here's the big enhancement (the one you have all been asking and waiting for).
If your current working directory has a seam-gen.properties file AND and build.xml file, then the seam script recognizes that you are in a seam-gen project and operates using the seam-gen.properties file in that directory rather than the seam-gen/build.properties in the Seam distribution. If you put the seam script (or a symlink to the seam script) on your PATH, then you can simply enter a project and run seam generate. If the seam script is not on your PATH, then you have to run something like ~/projects/seam-2.1.0.GA/seam generate. It really doesn't matter how it is invoked. This works across the board on Linux, Windows, and Mac. (By the way, writing cross platform scripts is a huge pain).
When your current directory is a seam-gen project, you essentially have the choice of using the seam script or the ant command to run the targets. The seam script is beneficial if the ant command is not on your PATH, though if you have Ant installed, then the seam script is just a middleman. That is, unless you are executing a code generation target (e.g., new-form, generate). Then you do need to use the seam script.
So there you have it, you can now use seam-gen to manage multiple projects and you can execute code generation from within the project! But wait, there is even more! If you don't yet have a seam-gen project created, you can feed a properties file of your choice into the script using the -Dseam-gen.properties flag:
seam -Dseam-gen.properties=seam-gen/myproject-build.properties
The value of the property must either be an absolute file path or a path relative to the root of the Seam distribution. You can also override the location of the seam-gen directory or even just the seam-gen templates (if you keep a customized version) using -Dseam-gen.dir and -Dtemplates.dir, respectively. It may be a little obscure to have to pass -D flags to the seam script, but it gives you the power you are looking for.
I hope you're excited about all the enhancements that I presented in this article and that it helps you to become more productive with your seam-gen projects. There is still work to be done, including a major refactoring of the seam-gen build system, which I am going to start documenting on this wiki page. But for now, you should have plenty of new toys to play with.
